Showing posts with label focal lengths. Show all posts

Tuesday, 8 March 2011

Exercise - Focal lengths with different viewpoints

The purpose of the exercise is to show how perspective changes as you change both your viewpoint and the focal length of the lens.

This image is taken from a considerable distance away from the statue using a 200mm (equivalent to 400mm) lens. In this case you end with an image with a very flat perspective. The person appears to be on the same plane and distance away as the statue.

This image is taken from much closer using a 14mm (28mm equivalent) lens. I am standing almost underneath the statue and looking up. Here it clearly looks as though it is towering over me and is much more imposing. The statue is also separated much more clearly from the background which has apparently receded into the distance and the group of people have come to the fore.

Monday, 21 February 2011

Exercise – Focal lengths and Different Viewpoints

I was walking down the street and came across this building site, it was an old furniture store that was left derelict and then had a major fire. It is now being torn down to make way for another Tesco’s.
The initial pictures here were all taken with a 14-45mm lens (equivalent to a 28 – 90 lens).
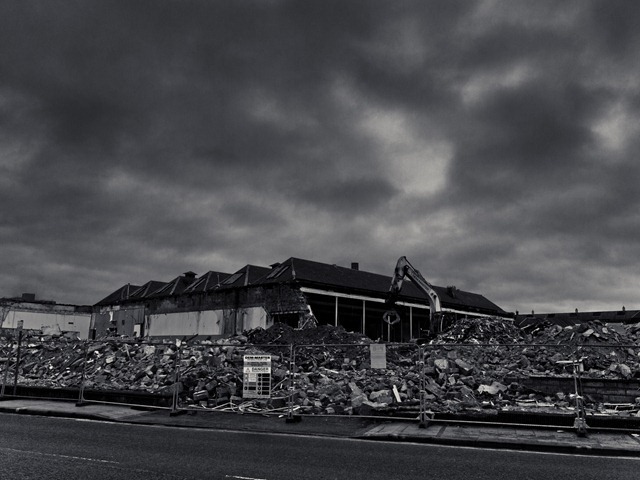
Starting-point_thumb                                                   Initial view from across the road - 14mm (equivalent to 28mm) lens.

Detail-1_thumb1                          Moving across the road and focusing on the demolition machine – 45mm (90 equivalent)

In-situ_thumb3Final composition with a low viewpoint emphasising the destruction and a monochrome conversion to enhance the brooding sky -  14mm (28 equivalent) – wide-angle

Having looked at these closely I decided that it would be worth exploring further close-up shots of the machines so I returned the next day. The weather had changed completely and it was a brilliantly sunny day which gave a complete change in colour. I used both the original lens and a telephoto 45 – 200mm (equivalent to 90 – 400mm) lens. The long lens enabled me to stand much further away and be able to concentrate on detailed shots.
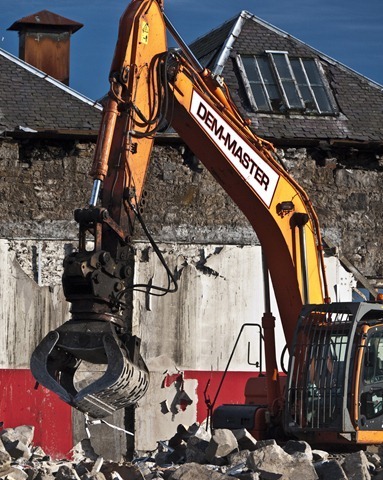
Dunfermline-Demolition-6_thumb Scene setting with a view of the whole machine, from over the road, same height as digger.- 91mm (180 equiv.) lens.

untitled-Also from over the road but this time with a wider angle lens (45mm – 90 mm equivalent) and showing the pattern of the digger and shadow echoing the pattern of the roofs.
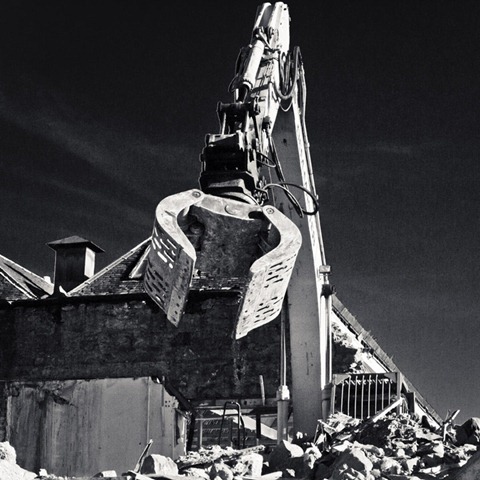
Dunfermline-Demolition-9_edited-1_th Looking up into the mouth of the machine from close underneath – 33mm (66equiv.) lens, this emphasis the height and power of the machine.

Dunfermline-Demolition-8_thumb                         untitled-1110095          Action details – 61mm (120 equivalent) – concentrating on the shadow as well as the grabber.

Dunfermline-Demolition-10_thumbClose-up detail. The use of the  telephoto lens (128mm – 256mm equivalent) here has had the effect of flattening the image and making it close to an abstract pattern. 

This series of photographs show that it is possible to take a widely varying range of pictures by:
a) changing one’s point of view: distance to close-up,
b) looking from a similar level to looking up from underneath,
c) by using different lenses and focal lengths.
d) Taking pictures on different days in different lights.
This exercise was to look at different ways of making a picture by using a variety of focal lengths and viewpoints. It is clear that all methods can be effective and the final choice has to be dependent on what one is trying to say with the image.

Wednesday, 16 February 2011

Exercise–Focal Lengths

This exercise is to look at the effect of changing the focal length of the lens on the amount of view you can take in at one time. I went down to the coast for this, the weather was not as good as I would have liked and the light was very changeable.

untitled-1110211                                         1. Taken with  the widest end of a zoom lens – 14mm (equivalent to 28mm).
untitled-1110204                                                    2. Taken at 45mm  (longest end of original zoom lens).
untitled-1110205                                       3. At 200mm – equivalent to 400mm, (longest end of a longer zoom lens).
untitled-1110200                    4.  Also 200mm, taken from the same spot as the last photo but with a very slight change of angle.
untitled-1110185-2                                           5. A slightly different angle of view using the 14mm (wide angle) zoom.
It is clear that one can markedly alter the amount of view seen by changing the focal length from an almost panoramic shot (if cropped) to what appears to be a close up. It is also interesting that with the longer focal length a very small shift in angle gives a completely different picture – while a similar shift in angle with the wide lens makes much less difference.
Lessons Learned:
1. Think carefully about what the picture is showing and (when possible) use an appropriate focal length.
2.  A combination of different focal lengths may tell the story better than just one.
3.  A telephoto lens may allow one to get pictures that are otherwise unobtainable. ( I would have had to be on a boat to get picture 4 without this lens).

Friday, 4 February 2011

Exercise – Focus at Different Apertures.

The aim of this exercise is to show how altering the aperture will alter the depth of field in the picture, that is, how much of the picture is in sharp focus. A wide aperture gives a small depth of field so only a small part of the picture will be sharply focused while a small aperture gives a large depth of field and therefore more (or all) of the picture is in focus. This is important to consider when setting up the camera as there are times when you may want the whole picture in focus, for instance in landscapes, and other times when it gives a more interesting effect to have some out of focus areas such as the background in a portrait.
I made several attempts to show this, initially trying outside using a row of houses, a pathway lined by trees and a fence and steps. The variation of focus could be seen, however did not make a very obvious change in any of these situations. This was probably because the light was not very bright and I had to give a fairly long exposure time at f/22 and therefore the picture was not pin sharp. I was also taking distance photographs and the effect of varying the depth of field is less in this case.
Example 1.
                      f/2.5                                        f/6.3                                        f/16
f 2_edited-1f 5_edited-1
f 16_edited-1


I then repeated the exercise with a still life set up using a tripod with the jugs lit from the side with a spotlight. I used a pancake lens with a focal length of 20mm (equivalent to 40mm) and was close to the jugs. This shows a much more obvious effect of the changing aperture. My preference her is the 2nd picture with a slight softening of focus to the rear as the gaze concentrates on the central jug without being too distracted by the out of focus areas that occur in picture 3.
Example 2.
jugs f 16                                                               aperture f/16 – the whole picture is in focus
jugs f8                                                 aperture f/8 – mostly in focus but the back is slightly soft
jugs f1_edited-1                              aperture f/1.7 – the only area completely sharp is the central jug that is at the focal point